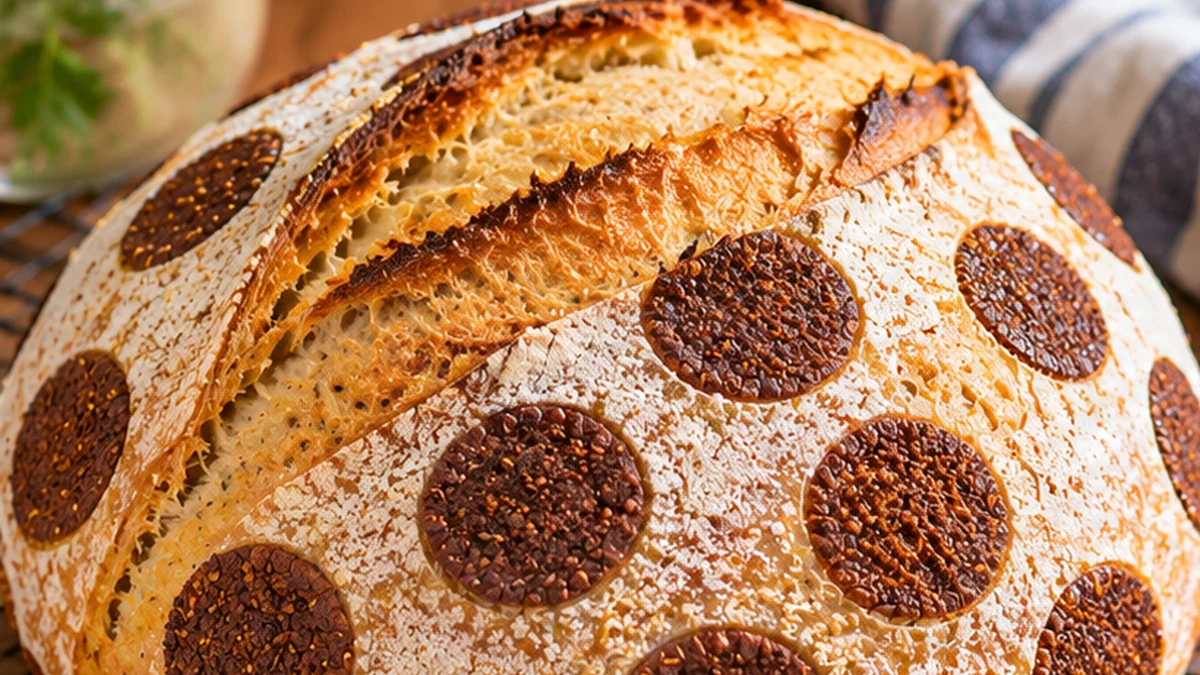
Polka dot sourdough bread is a crusty, naturally leavened loaf with a playful pattern of dark cocoa circles across a lightly floured top. The dots are an edible surface decoration, not chocolate chips or pockets of cocoa in the crumb. Start with a manageable 70% hydration dough, give it an overnight cold proof, and apply the pattern just before the loaf goes into a hot Dutch oven.
The look is inspired by the polka-dot sourdough designs circulating on social media, but the recipe below is an independent, measured home-baking method. You need an active starter, a basic parchment stencil, a fine sieve, and a bread lame or sharp blade. The dots take only a few minutes; good fermentation and a functional expansion score still determine whether the loaf bakes well.
For a different wheat-based bread, our Ezekiel bread recipe uses grains and legumes rather than an overnight sourdough fermentation. This version is a classic wheat loaf whose distinguishing feature is the edible pattern on its crust.
Table of Contents
Why This Polka Dot Sourdough Bread Works
A real sourdough formula: bread flour, active 100%-hydration starter, water, and salt produce a naturally leavened loaf without instant yeast.
Moderate hydration: about 70% overall hydration makes the dough easier to shape and decorate than a very wet loaf.
Cold dough holds the design: an overnight refrigerator proof firms the surface so a parchment stencil can sit on it briefly.
Edible contrast: a whisper of rice flour brightens the crust while a little black cocoa creates the dark polka dots.
One expansion score: a deeper cut placed away from the middle of the design lets the loaf open without splitting randomly.
No specialty printing tools: parchment circles and a small sieve are sufficient for the pattern.
What Makes the Dots: Stenciling, Not Chocolate Filling
A dot-patterned loaf can be made several ways. This recipe uses a surface stencil: perforated parchment temporarily covers the cold, shaped dough, then a thin layer of black cocoa lands through the holes. The stencil is lifted away before scoring and baking. The dark markings stay mainly on the crust, so the sliced interior looks like ordinary sourdough bread.
If you prefer white dots rather than dark dots, omit the cocoa, leave the loaf surface mostly bare, and dust rice flour through the holes. The baked finish will be different, but the same base dough and baking times can be used.
Ingredients and Tools
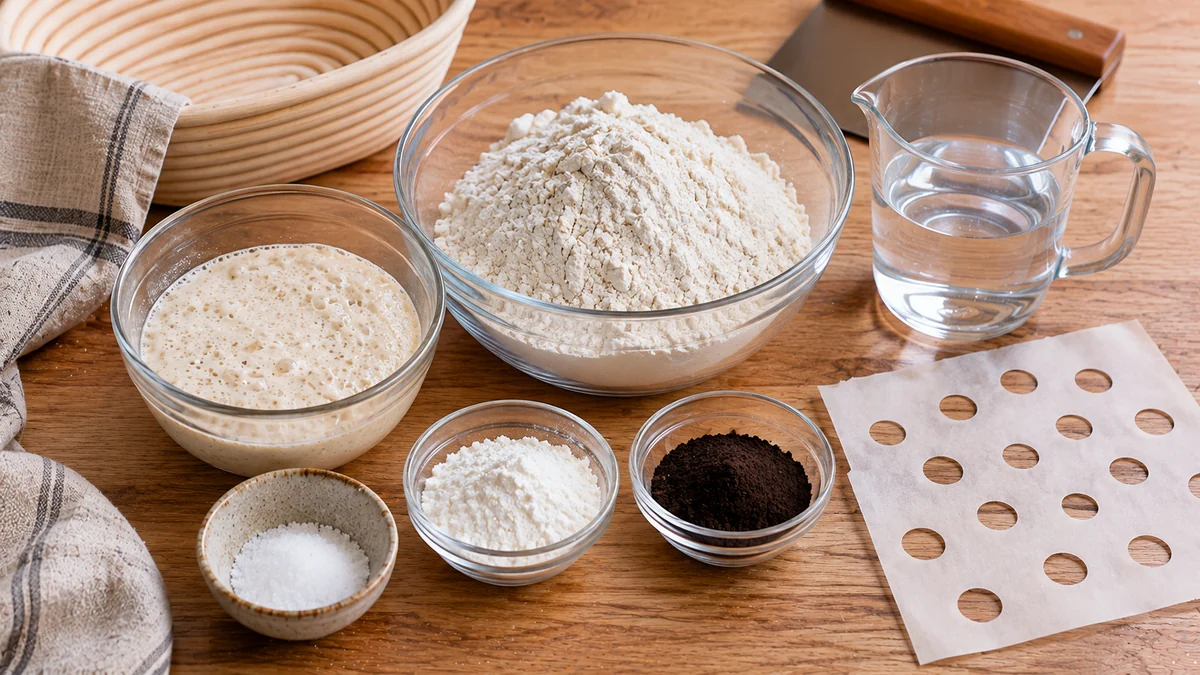
For one round loaf, measure the dough ingredients by weight: 450 g bread flour, 300 g water, 100 g ripe 100%-hydration starter, and 9 g fine salt. For the pattern, keep about 2 teaspoons (6 g) white rice flour and 1 teaspoon (2 g) black cocoa powder available. Both powders are for the crust only, and most of the dusting may remain in the sieve.
Use a digital scale, mixing bowl, proofing basket or towel-lined bowl, parchment, fine sieve, sharp blade, and a 4- to 6-quart lidded Dutch oven. Cut 1/2- to 3/4-inch holes into a clean parchment sheet, leaving enough connected paper to hold the stencil together.
Use an Active Starter, Not Discard
Your starter should be recently fed, bubbly, expanded, and near its peak. A collapsed or unfed starter may ferment the dough too slowly for the suggested schedule. The recipe assumes a starter fed with equal weights flour and water (100% hydration); a thick, stiff starter changes the dough hydration and should be adjusted rather than swapped cup for cup.
Bread flour gives the loaf strength, particularly important when you want a rounded top for decorating. Plain all-purpose flour can work in a pinch, but it may make the dough spread more. For a first attempt at this design, changing the flour and the hydration at the same time makes problems harder to diagnose.
Polka Dot Sourdough Bread Recipe Card
The ingredient weights, fold schedule, and Dutch-oven temperatures below refer to one loaf cut into 12 slices. The timing is an example for a reasonably active starter and a room around 74–78°F; watch the dough rather than forcing it to match the clock.
A crusty naturally leavened round loaf with edible cocoa polka dots stenciled onto a lightly floured crust.
Total Time:20 hours 20 minutes (approximate)
Yield:1 loaf (12 slices)
Ingredients
Scale
450 g bread flour (about 3 3/4 cups; weighing recommended)
300 g room-temperature water (about 1 1/4 cups)
100 g active 100%-hydration sourdough starter, bubbly and at or near peak (about 1/2 cup)
9 g fine salt (about 1 1/2 teaspoons, depending on salt brand)
2 teaspoons (about 6 g) white rice flour, for lightly dusting the crust
1 teaspoon (about 2 g) black cocoa powder, for stenciling the dark dots
Instructions
Combine active starter and water in a large bowl. Add bread flour and salt and mix until no dry flour remains. Cover and rest for 30 minutes.
Complete three sets of stretch-and-folds, each about 30 minutes apart. Cover between sets. Continue the bulk fermentation until the dough is airy and about 40–60% larger; allow roughly 4 hours total from mixing at 74–78°F, longer if cooler.
Pre-shape a round on a lightly floured counter. Rest 15 minutes, then shape into a taut boule. Place seam-side up in a rice-floured proofing basket. Cover and refrigerate approximately 10–16 hours; about 14 hours is a useful starting point.
Preheat oven and lidded Dutch oven to 475°F for 40–45 minutes. Cut several 1/2- to 3/4-inch circular holes into clean parchment for a stencil. Turn the cold dough onto a sheet of oven-safe parchment.
Dust the dough very lightly with rice flour. Position the paper stencil over the smooth top without pressing. Sift a thin layer of black cocoa through the holes, then lift stencil straight off. Remove the stencil completely before baking.
Score one expansion cut about 1/2 inch deep along the side of the top, away from the dots. Carefully lower the dough on parchment into the hot Dutch oven. Cover and bake 20 minutes at 475°F.
Remove the lid, reduce heat to 450°F, and bake another 20–25 minutes until the loaf is deeply golden and baked through (roughly 205–210°F in the center if checking). Cool on a rack for at least 1 hour before cutting 12 slices.
Notes
Timing estimate for a moderately warm kitchen: approximately 35 minutes active prep, 4 hours bulk fermentation, 14 hours cold proof, 1 hour cooling, and 45 minutes baking. Total: about 20 hours 20 minutes. Actual fermentation will vary.
No commercial yeast is used. Feed your sourdough starter first; unfed discard is not a reliable direct replacement.
The cocoa and rice flour decorate only the surface. The crumb remains plain, not dotted with chocolate or cocoa dough.
To make white dots instead, omit the cocoa and dust rice flour through the stencil over a relatively bare dough surface. This creates a different appearance.
This loaf contains wheat gluten. Nutrition is estimated using 450 g bread flour plus about 50 g flour in the starter, divided into 12 slices; coating powder contribution is minimal.
The baker should use oven-safe parchment and appropriate protection when handling the preheated Dutch oven.
Author:Adam Moretti
Prep Time:19 hours 35 minutes (including proof and cooling)
Cook Time:45 minutes
Category:Bread
Method:Dutch Oven
Cuisine:American
Diet:Vegan
How to Make Polka Dot Sourdough Bread
1. Mix and Rest the Dough
Stir 100 g active starter into 300 g water until mostly dispersed. Add 450 g bread flour and 9 g salt. Mix until no dry flour remains, then cover and rest 30 minutes. The dough should feel tacky and rough, not soupy. Do not add extra flour to make it smooth; the folds will strengthen it.
2. Build Strength With Folds
For the next 90 minutes, complete three sets of stretch-and-folds about 30 minutes apart. With a lightly damp hand, lift one side of the dough until it stretches and fold it toward the center. Rotate the bowl and repeat around all four sides. Cover between sets. By the third set, the surface should be smoother and the dough should hold together better.
3. Finish the First Rise
Let the dough continue bulk fermenting at room temperature until it has gained roughly 40–60% in volume, looks aerated at the edges, and jiggles slightly when the container moves. In a warm kitchen this can take about four hours from mixing; a cooler kitchen may need considerably longer. If the dough feels dense and shows no bubbles, it is not ready to shape, regardless of elapsed time.
4. Shape and Cold-Proof
Turn the dough onto a lightly floured counter. Gently pre-shape a round and let it rest about 15 minutes, then tighten it into a boule without aggressively pressing out all the gas. Place it seam-side up in a lightly rice-floured proofing basket. Cover well and refrigerate approximately 10–16 hours. A cold, firm loaf is easier to stencil than a soft, warm one.
5. Stencil the Polka Dots
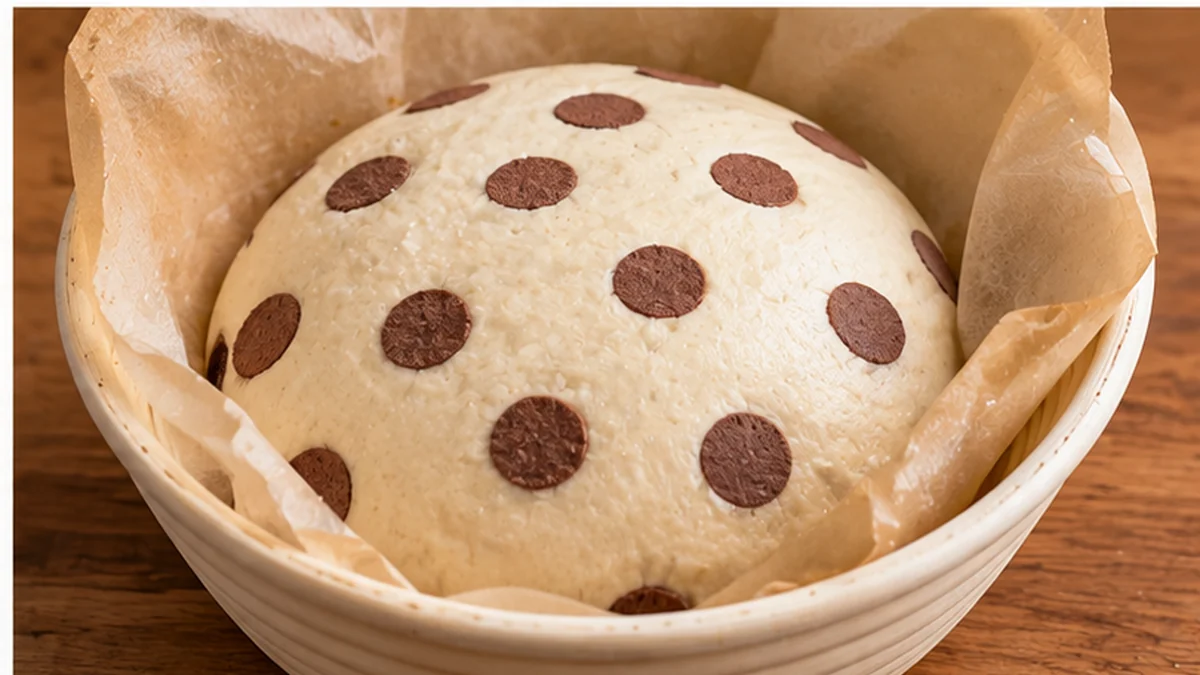
Preheat a Dutch oven and lid in a 475°F oven for about 40–45 minutes. Turn the cold dough onto parchment, so the smooth surface faces up. Dust the top very lightly with rice flour, brushing away large clumps. Position your perforated stencil gently over the dough. With a small fine sieve, dust a thin amount of black cocoa through the holes. Lift the stencil straight up without dragging it. The goal is distinct dots, not a thick bitter cocoa coating.
Do not press a cookie cutter into the dough to make the pattern: that would deform the gluten structure and is not what the stencil technique requires. The process image shows an unbaked dotted loaf; the marks should remain superficial. Keep the dot design away from the area you plan to score.
6. Score and Bake
With a bread lame or very sharp blade, make one firm expansion cut along the side of the top, about 1/2 inch deep. This functional cut gives the expanding loaf an opening without slicing through the center of the dots. Carefully lower the parchment and dough into the hot Dutch oven. Cover and bake at 475°F for 20 minutes. Remove the lid, reduce to 450°F, and bake another 20–25 minutes, until the crust is deep golden and the loaf sounds hollow when tapped. For another check, the center is often around 205–210°F when fully baked.
7. Cool Before Slicing
Transfer to a wire rack and cool at least one hour, preferably longer, before slicing. Cutting a steaming loaf can compress the crumb and make the center seem gummy even when it was baked through. Use a serrated knife to cut 12 fairly even slices.
How to Keep the Pattern Sharp
To preserve the pattern on polka dot sourdough bread, apply the dots at the very end of proofing, immediately before baking. Working with refrigerator-cold dough minimizes sticking, while a paper stencil with reasonably large openings produces cleaner circles than tiny pinholes. Hold the stencil near the surface but do not rub it into the dough. If a few dots blur, lift the paper rather than trying to move it sideways.
Stenciling decorates the crust; a deep score controls oven spring. King Arthur Baking’s decorative-scoring guide recommends thinking about how the loaf will expand before placing any pattern. A single diagonal or side score is easier for beginners than a complicated decorative web of cuts.
Use black cocoa sparingly. Regular unsweetened cocoa can make brown dots, but it will not look quite as dark. Rice flour does not blend into the damp surface as rapidly as wheat flour, which helps contrast, yet excessive flour can leave a chalky coating. A little more is not necessarily better.
Troubleshooting the Dough and the Dots
My Polka Dots Disappeared
The stencil may have dragged sideways or moisture may have blurred the cocoa. Work on a cold loaf, lift the stencil straight up, and do not spray the decorated surface after applying the dots. A very dark baked crust can also reduce contrast; use a lighter rice-flour background if needed.
The Bread Spread Instead of Rising
Weak starter, excess fermentation, insufficient folds, or loose shaping can all cause spreading. Check that the starter was active, the dough felt noticeably stronger after folding, and the bulk rise did not run far beyond a moderate increase. Cold proofing cannot rebuild a severely overproofed loaf. Try again with a tighter shape and dough-temperature awareness.
The Crust Burst Through the Pattern
A decorative stencil does not replace a functional score. Make one deep expansion cut on the side of the loaf, away from the dots. If the dough was already very proofed, oven spring may still be uneven; shorten the warm fermentation next time rather than adding more random slashes.
The Crumb Is Heavy or Gummy
Underfermented dough often bakes dense, while cutting before it cools can make even properly baked bread appear gummy. Let the dough become visibly aerated during bulk fermentation and cool the loaf fully. If the crust is deeply colored but the center needs more time, tent with foil and continue baking briefly at a lower temperature rather than removing the loaf early.
Variations and Practical Substitutions
White polka dots: use rice flour alone through the stencil on a darker, unfloured dough surface; skip the cocoa entirely.
Brown dots: regular unsweetened cocoa works, though the contrast is softer than with black cocoa.
Smaller or larger spots: cut different round holes into a separate parchment stencil; avoid a design so dense that the loaf looks completely covered.
Oval loaf: shape a batard instead of a boule, distribute dots along the top, and place the expansion score along one long side.
Whole-wheat variation: swap up to 50 g bread flour for whole-wheat flour, then evaluate whether a little extra water is needed; fermentation and the nutritional estimate will change.
This is not a gluten-free loaf. Bread flour and most wheat-based starters contain gluten, even after long fermentation. If you need a gluten-free baking project, our gluten-free apple cider donut bread uses a different flour system and does not depend on wheat gluten.
Raw-flour safety: do not taste the dough before baking, and clean work surfaces after handling raw flour. The FDA notes that flour is a raw food and may contain harmful bacteria until cooked.
Serving, Storage, and Freezing
Polka dot sourdough bread works for toast, sandwiches, and alongside soup. The cocoa is used in such a small amount on the crust that the loaf should taste primarily of sourdough, not chocolate. Toasting leftovers brings back a little crispness, although the dots may become less distinct after repeated handling.
Let polka dot sourdough bread cool completely, then keep it cut-side down or loosely wrapped at room temperature for about one to two days if your kitchen is cool and dry. For longer storage, slice and freeze in a tightly sealed freezer bag for best quality within two to three months. Toast slices from frozen or thaw them in a covered container. Avoid refrigerating plain bread for routine storage: the crumb tends to stale faster.
Do I need to make two sourdough doughs to get polka dots?
No. This version uses one plain sourdough dough and a cocoa stencil on the surface. You only need two doughs if you are deliberately creating a colored pattern throughout the crumb; that is another technique and not part of this recipe.
Can I make the dots without a store-bought stencil?
Yes. Cut round openings into a single clean piece of parchment, leaving connected paper between circles. Place it gently over cold dough, sift cocoa through it, and lift straight up. Never leave that stencil paper on the loaf during baking.
Can I use sourdough discard instead of active starter?
Not as a direct one-for-one substitution. Unfed discard may not provide enough rising power for this naturally leavened loaf. Feed your starter and use it when active; if you want to bake with discard, choose a formula designed for discard and usually another leavening agent.
Why are the dots on the crust, not inside every slice?
In this polka dot sourdough bread, cocoa is applied only to the surface after the cold proof. The interior remains regular sourdough. Some social-media spotted breads are made with layers of colored dough, but that is not the method used here.
How long does this polka dot sourdough bread take?
Plan around twenty hours from mixing through cooling if your starter is ready, including about four hours of bulk fermentation and a fourteen-hour refrigerator proof. Hands-on work is roughly 35 minutes. The real fermentation time varies with dough temperature, starter strength, and how quickly the dough rises.
Can I make this recipe vegan?
Yes. The standard dough contains wheat flour, water, starter, and salt, while the surface pattern uses rice flour and unsweetened cocoa. Check the labels of packaged ingredients for your dietary needs, and serve with plant-based toppings if you want a vegan snack.
Final Tips
For crisp, readable dots, use a healthy starter, keep the shaped dough cold, and resist the temptation to over-dust the stencil. Give the loaf a real expansion score, then bake it fully before cooling. If the pattern is imperfect on the first try, the underlying sourdough can still be excellent bread.
The appeal of this polka dot sourdough bread is that one modest surface-design change turns a familiar boule into a striking bake. Treat the stencil as the final decorative step, not a shortcut around proper fermentation, shaping, scoring, or cooling.
Reviewed recipe options
Make this recipe fit me
Choose one of seven popular diet options. NutriMatch will confirm whether the recipe already fits, show a reviewed adaptation when available, or recommend recipes that match your choice.
Please choose a diet first.
Already a reviewed match
This recipe already fits Dairy-Free.
No changes are needed based on its reviewed NutriMatch classification. Check the complete ingredients, product labels, and serving details for your own needs.
Recipe details, product formulas, and cross-contact information can change. Confirm current labels and use professional guidance when medically necessary.
Not available for this recipe
This recipe cannot currently be made Gluten-Free with a reviewed adaptation.
NutriMatch will not guess at substitutions. Try one of these recipes that is already reviewed for your choice.
Recipe details, product formulas, and cross-contact information can change. Confirm current labels and use professional guidance when medically necessary.
Not available for this recipe
This recipe cannot currently be made High Protein with a reviewed adaptation.
NutriMatch will not guess at substitutions. Try one of these recipes that is already reviewed for your choice.
Recipe details, product formulas, and cross-contact information can change. Confirm current labels and use professional guidance when medically necessary.
Not available for this recipe
This recipe cannot currently be made Keto with a reviewed adaptation.
NutriMatch will not guess at substitutions. Try one of these recipes that is already reviewed for your choice.
Recipe details, product formulas, and cross-contact information can change. Confirm current labels and use professional guidance when medically necessary.
Not available for this recipe
This recipe cannot currently be made Low Carb with a reviewed adaptation.
NutriMatch will not guess at substitutions. Try one of these recipes that is already reviewed for your choice.
Recipe details, product formulas, and cross-contact information can change. Confirm current labels and use professional guidance when medically necessary.
Already a reviewed match
This recipe already fits Vegan.
No changes are needed based on its reviewed NutriMatch classification. Check the complete ingredients, product labels, and serving details for your own needs.
Recipe details, product formulas, and cross-contact information can change. Confirm current labels and use professional guidance when medically necessary.
Already a reviewed match
This recipe already fits Vegetarian.
No changes are needed based on its reviewed NutriMatch classification. Check the complete ingredients, product labels, and serving details for your own needs.
Recipe details, product formulas, and cross-contact information can change. Confirm current labels and use professional guidance when medically necessary.